While working on making a module compatible with Drupal 9 I found that the module was using an obsolete function that had been replaced with a new service. It was something like this:
/**
 * My plugin.
 *
 * @SearchPlugin(
 *   id = "my_plugin",
 *   title = @Translation("My plugin")
 * )
 */
class MyPluginSearch extends SearchPluginBase implements AccessibleInterface, SearchIndexingInterface {

  /**
   * {@inheritdoc}
   */
  public static function create(
    ContainerInterface $container,
    array $configuration,
    $plugin_id,
    $plugin_definition
  ) {
    return new static(
      $configuration,
      $plugin_id,
      $plugin_definition
    );
  }

  /** ... **/
  public function indexClear() {
    search_index_clear($this->getPluginId());
  }
}
The function search_index_clear is now part of the new search.index service that was added in Drupal 8.8. In order to keep this working on Drupal 8.8+ and Drupal 9 we need to inject the service in the create function. But if we do this unconditionally, we will get an error in Drupal 8.7 because that service was added on 8.8. What to do then?
Fortunately years ago I read an article that addressed a similar need. It talked about how to safely extends Drupal 8 plugin classes without fear of constructor changes. In my case I didn't want to change the constructor, so as to keep it compatible with Drupal 8.7 and below. At the same time, I wanted to inject the new service to use it in Drupal 8.8+ and Drupal 9. I just modified a bit my code to something like this:
/**
 * My plugin.
 *
 * @SearchPlugin(
 *   id = "my_plugin",
 *   title = @Translation("My plugin")
 * )
 */
class MyPluginSearch extends SearchPluginBase implements AccessibleInterface, SearchIndexingInterface {

  /** ... */
  protected $searchIndex;

  /**
   * {@inheritdoc}
   */
  public static function create(
    ContainerInterface $container,
    array $configuration,
    $plugin_id,
    $plugin_definition
  ) {
    $instance =  new static(
      $configuration,
      $plugin_id,
      $plugin_definition
    );

    // Only inject the service in Drupal 8.8 or newer.
    if (floatval(\Drupal::VERSION) >= 8.8) {
      $instance->searchIndex = $container->get('search.index');
    }

    return $instance;
  }

  /** ... **/
  public function indexClear() {
    if (floatval(\Drupal::VERSION) >= 8.8) {
      $this->searchIndex->clear($this->getPluginId());
    }
    else {
      search_index_clear($this->getPluginId());
    }
  }
}
And that's it, Drupal 8.8 and newer will take advantage of the new service while we keep this compatible with Drupal 8.7. This will give users more time to upgrade to Drupal 8.8+ or Drupal 9.
Today we will learn how to migrate content from a Comma-Separated Values (CSV) file into Drupal. We are going to use the latest version of the Migrate Source CSV module which depends on the third-party library league/csv. We will show how configure the source plugin to read files with or without a header row. We will also talk about a new feature that allows you to use stream wrappers to set the file location. Let’s get started.
Getting the code
You can get the full code example at https://github.com/dinarcon/ud_migrations The module to enable is UD CSV source migration whose machine name is ud_migrations_csv_source. It comes with three migrations: udm_csv_source_paragraph, udm_csv_source_image, and udm_csv_source_node.
You can get the Migrate Source CSV module is using composer: composer require drupal/migrate_source_csv. This will also download its dependency: the league/csv library. The example assumes you are using 8.x-3.x branch of the module, which requires composer to be installed. If your Drupal site is not composer-based, you can use the 8.x-2.x branch. Continue reading to learn the difference between the two branches.
Understanding the example set up
This migration will reuse the same configuration from the introduction to paragraph migrations example. Refer to that article for details on the configuration: the destinations will be the same content type, paragraph type, and fields. The source will be changed in today's example, as we use it to explain JSON migration. The end result will again be nodes containing an image and a paragraph with information about someone’s favorite book. The major difference is that we are going to read from JSON.
Note that you can literally swap migration sources without changing any other part of the migration. This is a powerful feature of ETL frameworks like Drupal’s Migrate API. Although possible, the example includes slight changes to demonstrate various plugin configuration options. Also, some machine names had to be changed to avoid conflicts with other examples in the demo repository.
Migrating CSV files with a header row
In any migration project, understanding the source is very important. For CSV migrations, the primary thing to consider is whether or not the file contains a row of headers. Other things to consider are what characters to use as delimiter, enclosure, and escape character. For now, let’s consider the following CSV file whose first row serves as column headers:
unique_id,name,photo_file,book_ref
1,Michele Metts,P01,B10
2,Benjamin Melançon,P02,B20
3,Stefan Freudenberg,P03,B30
This file will be used in the node migration. The four columns are used as follows:
-
unique_idis the unique identifier for each record in this CSV file. -
nameis the name of a person. This will be used as the node title. -
photo_fileis the unique identifier of an image that was created in a separate migration. -
book_refis the unique identifier of a book paragraph that was created in a separate migration.
The following snippet shows the configuration of the CSV source plugin for the node migration:
source:
  plugin: csv
  path: modules/custom/ud_migrations/ud_migrations_csv_source/sources/udm_people.csv
  ids: [unique_id]
The name of the plugin is csv. Then you define the path pointing to the file itself. In this case, the path is relative to the Drupal root. Finally, you specify an ids array of columns names that would uniquely identify each record. As already stated, the unique_id column servers that purpose. Note that there is no need to specify all the columns names from the CSV file. The plugin will automatically make them available. That is the simplest configuration of the CSV source plugin.
The following snippet shows part of the process, destination, and dependencies configuration of the node migration:
process:
  field_ud_image/target_id:
    plugin: migration_lookup
    migration: udm_csv_source_image
    source: photo_file
destination:
  plugin: 'entity:node'
  default_bundle: ud_paragraphs
migration_dependencies:
  required:
    - udm_csv_source_image
    - udm_csv_source_paragraph
  optional: []
Note that the source for the setting the image reference is photo_file. In the process pipeline you can directly use any column name that exists in the CSV file. The configuration of the migration lookup plugin and dependencies point to two CSV migrations that come with this example. One is for migrating images and the other for migrating paragraphs.
Migrating CSV files without a header row
Now let’s consider two examples of CSV files that do not have a header row. The following snippets show the example CSV file and source plugin configuration for the paragraph migration:
B10,The definite guide to Drupal 7,Benjamin Melançon et al.
B20,Understanding Drupal Views,Carlos Dinarte
B30,Understanding Drupal Migrations,Mauricio Dinarte
source:
  plugin: csv
  path: modules/custom/ud_migrations/ud_migrations_csv_source/sources/udm_book_paragraph.csv
  ids: [book_id]
  header_offset: null
  fields:
    - name: book_id
    - name: book_title
    - name: 'Book author'
When you do not have a header row, you need to specify two more configuration options. header_offset has to be set to null. fields has to be set to an array where each element represents a column in the CSV file. You include a name for each column following the order in which they appear in the file. The name itself can be arbitrary. If it contained spaces, you need to put quotes (') around it. After that, you set the ids configuration to one or more columns using the names you defined.
In the process section you refer to source columns as usual. You write their name adding quotes if it contained spaces. The following snippet shows how the process section is configured for the paragraph migration:
process:
  field_ud_book_paragraph_title: book_title
  field_ud_book_paragraph_author: 'Book author'
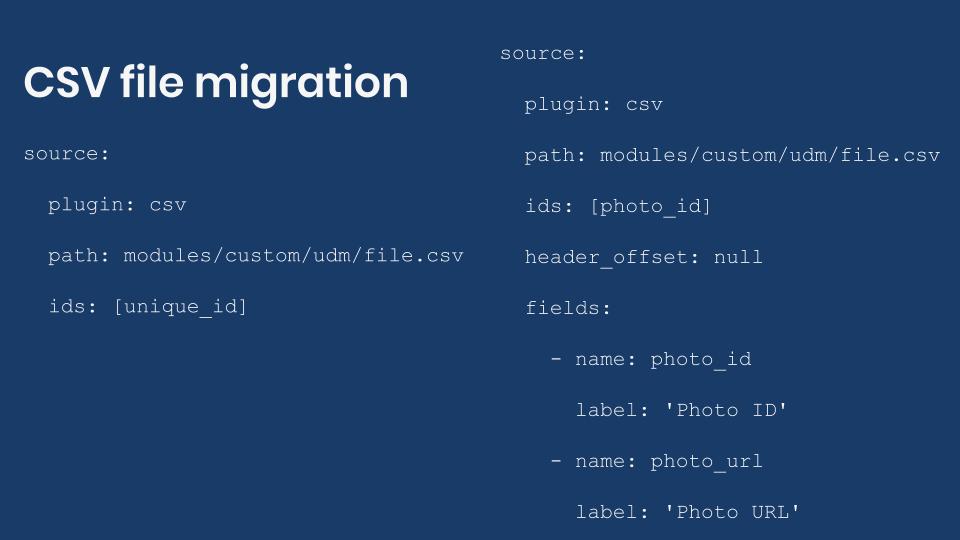
The final example will show a slight variation of the previous configuration. The following two snippets show the example CSV file and source plugin configuration for the image migration:
P01,https://agaric.coop/sites/default/files/pictures/picture-15-1421176712.jpg
P02,https://agaric.coop/sites/default/files/pictures/picture-3-1421176784.jpg
P03,https://agaric.coop/sites/default/files/pictures/picture-2-1421176752.jpg
source:
  plugin: csv
  path: modules/custom/ud_migrations/ud_migrations_csv_source/sources/udm_photos.csv
  ids: [photo_id]
  header_offset: null
  fields:
    - name: photo_id
      label: 'Photo ID'
    - name: photo_url
      label: 'Photo URL'
For each column defined in the fields configuration, you can optionally set a label. This is a description used when presenting details about the migration. For example, in the user interface provided by the Migrate Tools module. When defined, you do not use the label to refer to source columns. You keep using the column name. You can see this in the value of the ids configuration.
The following snippet shows part of the process configuration of the image migration:
process:
  psf_destination_filename:
    plugin: callback
    callable: basename
    source: photo_url
CSV file location
When setting the path configuration you have three options to indicate the CSV file location:
- Use a relative path from the Drupal root. The path should not start with a slash (/). This is the approach used in this demo. For example,
modules/custom/my_module/csv_files/example.csv. - Use an absolute path pointing to the CSV location in the file system. The path should start with a slash (/). For example,
/var/www/drupal/modules/custom/my_module/csv_files/example.csv. - Use a stream wrapper. This feature was introduced in the 8.x-3.x branch of the module. Previous versions cannot make use of them.
Being able to use stream wrappers gives you many options for setting the location to the CSV file. For instance:
- Files located in the public, private, and temporary file systems managed by Drupal. This leverages functionality already available in Drupal core. For example:
public://csv_files/example.csv. - Files located in profiles, modules, and themes. You can use the System stream wrapper module or apply this core patch to get this functionality. For example,
module://my_module/csv_files/example.csv. - Files located in remote servers including RSS feeds. You can use the Remote stream wrapper module to get this functionality. For example,
https://understanddrupal.com/csv-files/example.csv.
CSV source plugin configuration
The configuration options for the CSV source plugin are very well documented in the source code. They are included here for quick reference:
-
pathis required. It contains the path to the CSV file. Starting with the 8.x-3.x branch, stream wrappers are supported. -
idsis required. It contains an array of column names that uniquely identify each record. -
header_offsetis optional. The index of record to be used as the CSV header and the thereby each record's field name. It defaults to zero (0) because the index is zero-based. For CSV files with no header row the value should be set tonull. -
fieldsis optional. It contains a nested array of names and labels to use instead of a header row. If set, it will overwrite the column names obtained fromheader_offset. -
delimiteris optional. It contains one character column delimiter. It defaults to a comma (,). For example, if your file uses tabs as delimiter, you set this configuration to\t. -
enclosureis optional. It contains one character used to enclose the column values. Defaults to double quotation marks ("). -
escapeis optional. It contains one character used for character escaping in the column values. It defaults to a backslash (****).
Important: The configuration options changed significantly between the 8.x-3.x and 8.x-2.x branches. Refer to this change record for a reference of how to configure the plugin for the 8.x-2.x.
And that is how you can use CSV files as the source of your migrations. Because this is such a common need, it was considered to move the CSV source plugin to Drupal core. The effort is currently on hold and it is unclear if it will materialize during Drupal 8’s lifecycle. The maintainers of the Migrate API are focusing their efforts on other priorities at the moment. You can read this issue to learn about the motivation and context for offering functionality in Drupal core.
Note: The Migrate Spreadsheet module can also be used to migrate data from CSV files. It also supports Microsoft Office Excel and LibreOffice Calc (OpenDocument) files. The module leverages the PhpOffice/PhpSpreadsheet library.
What did you learn in today’s blog post? Have you migrated from CSV files before? Did you know that it is now possible to read files using stream wrappers? Please share your answers in the comments. Also, I would be grateful if you shared this blog post with others.
Next: Migrating JSON files into Drupal
This blog post series, cross-posted at UnderstandDrupal.com as well as here on Agaric.coop, is made possible thanks to these generous sponsors: Drupalize.me by Osio Labs has online tutorials about migrations, among other topics, and Agaric provides migration trainings, among other services. Contact Understand Drupal if your organization would like to support this documentation project, whether it is the migration series or other topics.
It's great to be here, and there, and there.
Thanks Indieweb module for Drupal!
Find It Cambridge es un recurso en línea que permite a las familias, los jóvenes y quienes los apoyan encontrar fácilmente actividades, servicios y recursos en Cambridge, Massachusetts. Sirve como sitio web de ventanilla única para quienes viven y trabajan en Cambridge.
El Reto
Crear un calendario de eventos y un directorio de programas central para la vida de las personas es un desafío. Los gobiernos municipales son conocidos por los silos y la redundancia. La ciudad de Cambridge estaba decidida a hacer algo diferente.
Esto comenzó con una investigación exhaustiva de usuarios dirigida por la ciudad. Los residentes de Cambridge y representantes de la ciudad, escuelas y organizaciones comunitarias completaron más de 250 entrevistas y 1,250 encuestas. Tomarse el tiempo para encuestar y entrevistar a los residentes todos los días nos aseguró que pudiéramos construir con confianza un sitio verdaderamente útil.
De esa investigación aprendimos que el sitio necesitaba:
- Búsqueda potente, pero intuitiva para los residentes de Cambridge
- Experiencia de autor amigable para los proveedores de servicios.
- Número de teléfono con un humano en el otro extremo.
El Enfoque
Para hacer realidad los hallazgos de la investigación, combinamos fuerzas con Terravoz, una agencia de investigación y desarrollo digital que asumió el liderazgo en el desarrollo de VOIP, y con Todd Linkner, un diseñador y desarrollador de aplicaciones que definió la identidad de marca de Find It Cambridge y desarrolló un estilo de acompañamiento. guía.
Una Búsqueda para Locales
Hay cientos de eventos, programas y organizaciones en Cambridge. Encontrar exactamente lo que uno está buscando para un sofisticado sistema de filtrado es una necesidad. Elegimos a Apache Solr, líder del paquete cuando se trata de filtrado avanzado.
Una faceta particularmente interesante surgió de la geografía única de Cambridge. A pesar de abarcar un área relativamente pequeña, los límites del vecindario de Cambridge son infame creativos. Incluso los residentes de larga data no necesariamente saben dónde termina un vecindario y dónde comienza otro. Entonces, aunque el filtro por vecindario es útil, decidimos que una ayuda visual estaba en orden.
Todd Linkner creó un archivo de imagen SVG personalizado que representa los vecindarios de Cambridge. Luego tomamos ese archivo SVG y escribimos un módulo personalizado que asocia cada sección de mapa de vecindario a un término de vocabulario de Drupal. El resultado es un filtro de mapa en el que se puede hacer clic para ayudar a los visitantes del sitio a encontrar rápidamente la programación en su área.
Un mapa en el que se puede hacer clic permite a los residentes filtrar por vecindario.
Proveedores de Servicios de Apoyo
Para que un centro de conocimiento como Find It Cambridge prosperara, era necesario que los proveedores de servicios se lo compraran. Obtener su aporte durante la fase de investigación establece esa relación con el pie derecho. La respuesta resonante fue que el sitio necesitaba ser fácil de usar.
Esto demostró ser un desafío porque si bien la facilidad de uso era crítica, también era esencial que los eventos y los programas tuvieran metadatos ricos. Cuantos más datos solicitamos a los usuarios, más complejas se vuelven las interfaces.
Para solucionar esto, aprovechamos el panel de control personalizable de Drupal y el módulo de Grupos de campo.
Cuadro de Mandos Personalizado
De forma predeterminada, la primera página que ve un usuario al iniciar sesión en un sitio de Drupal es una página de perfil de usuario poco satisfactoria.
Hemos personalizado un panel con las acciones clave que los proveedores realizan en el sitio: crear contenido nuevo, actualizar contenido pasado y responder preguntas sobre el sitio.
Un panel personalizado brinda acceso rápido a las tareas e información más comunes para los proveedores de servicios.
Si bien hay un módulo de Drupal Dashboard, optamos por construirlo nosotros mismos para obtener la máxima flexibilidad y control. Al hacerlo, nos permitió dividir la información en varias pestañas de trabajo. Una página administrativa personalizada para las páginas de documentación interna y otra información de Find It Cambridge transfiere el control sobre la sección "¿Tiene preguntas?" Del panel a los administradores del sitio, en lugar de estar codificado.
Eliminar Sin Preocupaciones
Con docenas de proveedores de servicios que administran el contenido en el sitio, es probable que ocurran errores. El peor escenario es la eliminación accidental de un nodo. En Drupal, cuando se elimina un nodo, desaparece para siempre. Para protegernos de estos, utilizamos el módulo Killfile para nodos "eliminados", permitiendo su recuperación si es necesario.
Ayudar a Los Gerentes Ayudar a Los Proveedores
Otra pieza clave para obtener información relevante y oportuna agregada al sitio es ayudar al equipo de Find It Cambridge a recordar y apoyar a los proveedores de servicios para que usen el sitio y actualicen su información. Con ese fin, creamos una página de estadísticas que enumera las organizaciones en orden alfabético, junto con la cantidad de programas y eventos que tienen. Esto le permite al equipo detectar rápidamente entradas duplicadas y otros datos incorrectos.
También implementamos un sistema de notificación. Cada vez que un proveedor de servicios agrega o actualiza contenido, el equipo de Find It recibe un correo electrónico. Esto ayuda a los administradores a mantenerse al tanto del contenido siempre cambiante del sitio.
Resultados
Desde que Find It Cambridge se lanzó, 333 organizaciones crearon cuentas y contribuyeron al directorio. Los residentes ahora tienen un solo sitio al que pueden referirse para mantenerse conectados con los eventos y acceder a los programas. El esfuerzo también ha fomentado una mayor colaboración entre los departamentos y servicios de la ciudad.
Conectar a la comunidad es un proceso continuo y continuamos mejorando el sitio para conectar mejor a los residentes.
We could also choose not to connect the final items with a comma, if we were ignoramuses unaware of the Oxford comma. In this case for our example we would see "By Clayton Dewey, Ben Melançon and David Valdez." We are aware, however, so we would enable the series comma option in the In Other Words formatter configuration.
Editor's note: The extreme partisanship in favor of the serial comma is all that Ben contributed to this blog post, but this same unreasoning fervor contributed to starting the module in the first place and creating a PHP package for making lists using the Oxford comma, which the module relies upon.
If we want text before or after, that is also an option. In this case, preceding the authors with "By " is a nice way to denote attribution.
It is worth noting, though, that In Other Words module can count! To display different preceding or following text if only one item is present, put the plural version first and then a | (pipe symbol) and the singular version. We could have configured the field display to hide the "Author(s)" label and configured the field format to have Text before of "Authors: |Author: " if we wanted to keep a more regimented style while including the nicety of precise labels. This feature can also be used for subject-verb agreement, "Jim and Steph are the authors" and "Steph is the author" could be achieved by configuring the Text after to be " are the authors| is the author". (This is a place where we could improve how intuitive the interface is, for sure.)

Find It Cambridge
Oportunidades para quienes viven, trabajan y juegan en Cambridge.

Agaric hosts a weekly online gathering known as Show and Tell. Participants share tips and tricks we have learned and pose questions to other developers on tasks or projects we are working on. Each week we ask people to send us a little info on what they would like to present. This is not a prerequisite, just a suggestion. Having advance notice of presentations allows us to get the word out to others that may be interested, but you can just show up, and there will most likely be time to present for 5-10 minutes. Sign onto the Show and Tell mailing list and be notified of upcoming Show and Tell events.
Recently we have opened up the Show and Tell chat to bond with other cooperatives that do web development work. Agaric was contacted by members of Fiqus.coop in Argentina as they had started an initiative to meet other cooperative developers and share values and goals. No one had sent notice of a presentation, so we switched the topic of the chat to be more of a meet and greet to get to know each other better with the goal in mind to be able to share our work on projects. The value of the meeting was immediately apparent as we delved into conversation with a few members of Fiqus.
Next, we invited more developers to take part in the discussion, and the doors were opened to share more deeply and connect. This week our meeting was over the top! Nicolas Dimarco led us through a short presentation of slides that revealed a Federated process and workflow to share development with members of multiple cooperatives. The plan is so simple that everyone immediately understood and the conversation that ensued was compelling, and the questions were indicative of where we need to educate each other about cooperative principles vs. corporate tactics. We need more discussion on trust and friendship. There are so many developers in corporate jobs that have asked me how a web development cooperative works and how does a project run without a manager. I first explain that projects do have managers, but they are managing the work, not the people. Taking time to get to know each other's skills and passions about programming is a core part of being able to work together in a Federation. Fiqus.coop has made it plain and simple for all to see the path to sharing work on projects!
Here is a link to the video recording of the chat where Nicolas Dimarco of Fiqus.coop presents the formula for federated work among cooperatives. Here is a link to the notes from the meeting on 3/20/2019 and some past Show and Tell meetings.
More information on Show and Tell.
Some Drupal shops already work together on projects and we can help that grow by sharing our experiences. We would love to hear about the ways you work and the processes you have discovered that make sharing work on projects a success!
Resources
We're always publishing more about migrating data and also have a growing collection of resources in the follow-up section of our migration training resources page.
And be sure to check out our other trainings!
Sign up to be notified when Agaric gives a migration training:
Image credit: Karlheinrichpasch, CC BY-SA 4.0, via Wikimedia Commons.
Portside es un medio de comunicación digital que publica y cura artículos y videos de interés para la izquierda. Esta curación levanta voces críticas en una era de saturación de medios y facilita el diálogo en línea inteligente y atrevido.
Micky was a keynote speaker at UMASS Amherst during the NERD Summit event and the closing keynote speaker at LibrePlanet 2019 @M.I.T. She spoke about how we, as people and as programmers, can work our way out of the digital world of Nineteen Eight-Four that we are living in. Rather than having about ten slides of fine print and links in the presentation, we are posting resources in this blog post.
Here is a short-enough-to-write-on-a-business-card link for this page – agaric.coop/libreplanet2019 – for sharing these resources with others more easily.
Sign up to be notified when Agaric gives an online or in-person migration training:
The red boxes above indicate what needs to be done. Be sure to select the relationship you added to the Relationship field. This will allow the contextual filter to use the value of the Event's entity reference field for comparison.
Click Provide default value and select Content ID from URL in the dropdown that appears. Note that if your nodes have URL aliases that do not include the content ID, Drupal will still provide the content ID to your contextual filter. Now your view will know which content to display by comparing the current node ID with the the values in the entity reference field of each listing.
Lastly, Click Apply and do not forget to save your view.
The End
Congratulations! Now we know how to filter our view by content that references the current node. You probably still need to place your block and configure which nodes it should or should not display on, but I think that is a "How to" for another day. Have fun Drupaling!

Empieza con Drupal
Nos encanta presentar a los principiantes los conceptos básicos de Drupal. Ofrecemos seminarios introductorios cortos para grupos pequeños según demanda para la construcción del sitio, la creación de plantillas y el desarrollo de extensiones. Cada seminario incorpora, cuando corresponde, la arquitectura de la información, las pruebas de experiencia del usuario y las técnicas de liderazgo y colaboración necesarias para que cualquier proyecto que no sea solo sea un éxito.
Desarrolla tus Habilidades
Enseñamos equipos de desarrollo y programadores en solitario en nuestro lugar de trabajo o en el suyo, con el programa adaptado a los problemas que está tratando de resolver. Hemos proporcionado tal capacidad en programación Drupal, temática y plantillas, migración de datos y Backbone.js, pero siempre estamos mejorando nuestras habilidades tecnológicas, así que háganos saber lo que está buscando y es posible que estemos justo delante de Estás en la curva de aprendizaje y listo para tirar una cuerda - y listo para tirar una cuerda.
Inscribirse en un Curso
We offer courses with a defined curriculum on building, theming and developing a site. This is great for intermediate trainings of groups. We also offer decision-maker seminars for leaders who need a better understanding of the technology underlying their projects.
¿Por qué Agaric?
Aprenda Drupal 8 de expertos profesionales, con énfasis en los profesionales: Tenemos la experiencia práctica en el desarrollo de sitios web para impartir las habilidades necesarias para realizar el trabajo y hacerlo bien.
Como desarrolladores, Agaric es conocido por asumir las tareas difíciles cuando colaboramos en equipos más grandes. Estamos encantados de capacitarlo, porque siempre hay algo difícil que querrá contratarnos para hacer. En serio, desde nuestros primeros proyectos hace diez años, nuestro objetivo ha sido hacer que nuestros clientes nos necesiten lo menos posible, para poner todo el poder posible en las manos de nuestros clientes. Es por eso que comenzamos a utilizar los sistemas de administración de contenido en primer lugar, y es una tradición que continuamos desarrollando con Software Libre, escribiendo documentación y brindando capacitación.
Agaric participa activamente en la comunidad Drupal en general y se ha presentado en varios Campamentos Drupal, así como en la organización de Jornadas Mundiales de Capacitación en Nicaragua desde 2013.
