Upload media inline in WYSIWYG editor in modern Drupal 10+ with CKEditor5
It seems like the best practice is that we should try to use the media manager rather than just drop in photos using the text editor method (which doesn't seem to get the photos into the media library), but how do we get the photos in the media library to be able to wrap with text and not be visually separate content?

Display lists naturally with the In Other Words module for Drupal
It is common for a Drupal site to list multiple items. It could be several authors of a single article, the days that a recreation center is open, or the flavors an ice cream parlor serves. Clean, structured data is a strong point of Drupal, but the display of that structured content is limited. That is why Agaric, with support from DevCollaborative, made In Other Words, a Drupal module that gives site builders the power to configure precise and natural ways to display lists of items.

Did the Internet make you a criminal? How can it be proven?
Let's explore digital threats and solutions, including Internet Access, Big Data, and Surveillance Capitalism. Discover how the data collected by big tech can be used to incriminate you and learn practical tips to enhance online privacy. Explore ethical considerations and challenges posed by emerging technologies like AI and social media. Gain a deeper understanding of online privacy and learn to navigate the digital world confidently while protecting your personal information effectively.

Always run the desired PHP version when your hosting solution has multiple versions available
At Agaric, we perform a lot of Drupal upgrades. These very often involve transitioning away from older versions of PHP. Even when your hosting service provides multiple versions of PHP, you can still run into issues activating the appropriate one for each site: whether that's within the web server, at the command line, or via drush (or other tools). In this blog post, we'll be providing remedies for all of these cases. Most content applies to any PHP application.
Hear from us
![]() We look forward to being in communication, perchance to work together or just to meet in person sometime!
We look forward to being in communication, perchance to work together or just to meet in person sometime!
Keegan is a Web Developer, focused mostly on building sites using Drupal and/or front-end JavaScript frameworks (like React.js), and is also a Drupal core contributor.
Keegan's longest-lived hobbies are being in nature, sonic-doodling, and studying the history and philosophy of science and technology. Having a degree in Environmental Science and Technology, Keegan learned early that there is no deficiency in the capabilities of modern technology to create a more equitable and sustainable global infrastructure, but a lack of funding. Hence, Keegan believes that the future of societal health depends on collective efforts to provision and employ information and communications infrastructure that is owned and controlled by the people who use it—not by the full-fledged military contractors that big tech comprises—so that love, democracy, community, and eco-friendly infrastructure can thrive.
Keegan is inspired, as a worker-owner of a tech coop, to have recognized the practical benefits of Libre software and of the cooperative model toward the respective protection and cultivation of attentional liberation, and is always beyond delighted to hear whenever someone else has made the same or similar discoveries. Most of all, Keegan is humbled to be immersed in a positive work-culture that emphasizes action-oriented ethical practices, and to be surrounded day-to-day by brilliant friends and mentors.
Sign up to be notified when Agaric gives a migration training:
Learning Objectives
- Understand the different approaches to upgrading your site to Drupal 9 using the Migrate API.
- Revise site architecture and map configuration from the previous site to the new one
- Use the Migrate Drupal UI module to understand module requirements for running upgrades.
- Use the Migrate Upgrade module to generate migration files.
- Cherry-pick content migrations for getting a content type migrated to Drupal 9.
- Modify a migration to convert a content type to a user entity.
- Modify a migration to convert a content type to a paragraph entities.
- Migrate images to media entities.
- Learn about writing a custom process plugin for providing a migrate path for modules that do not include one already.
- Tips and recommendations upgrade projects.
Prerequisites
This is an advanced course that requires familiarity with the Drupal migration concepts. Our Drupal 9 content migrations training will give you all the background knowledge that you need. Alternatively, you can read the 31 days of migrations series in our blog or watch this video for an overview of the Migrate API.
Setup instructions
Having a Drupal 7 and Drupal 9 local installation is required to take this course. We offer this repository with a virtual machine configured with the two Drupal installations used in the training. Alternatively, you can use a tool like DrupalVM, Lando, DDEV, or Docksal. You will have to be able to restore a MySQL database dump containing the Drupal 7 database. Drupal 9 site needs to be able to connect to the Drupal 7 database. Drush needs to be installed in order to run migrations from the command line.
This training will be provided over Zoom. You can ask questions via text chat or audio. Sharing your screen, but you might want to do it to get assistance on a specific issue. Sharing your camera is optional.
What to expect

Prior to the training
Attendees will receive detailed instructions on how to setup their development environment. In addition, they will be able to join a support video call days before the training event to make the the local development environment is ready. This prevents losing time fixing problems with environment set up during the training.
On the days of the training
- The training totals 7 hours of instruction, which we usually split into 2 sessions.
- A team of developers available to answer questions and help with training-related issues.
After the training
- Attendees will receive copies of the training recordings.
- Attendees will receive a free copy of the 31 days of migrations book.
- Attendees will receive a certificate of completion.

In recent posts we have explored the Migrate Plus and Migrate Tools modules. They extend the Migrate API to provide migrations defined as configuration entities, groups to share configuration among migrations, a user interface to execute migrations, among other things. Yet another benefit of using Migrate Plus is the option to leverage the many process plugins it provides. Today, we are going to learn about two of them: `entity_lookup` and `entity_generate`. We are going to compare them with the `migration_lookup` plugin, show how to configure them, and explain their compromises and limitations. Let’s get started.
What is the difference among the migration_lookup, entity_lookup, entity_generate plugins?
In the article about migration dependencies we covered the `migration_lookup` plugin provided by the core Migrate API. It lets you maintain relationships among entities that are being imported. For example, if you are migrating a node that has associated users, taxonomy terms, images, paragraphs, etc. This plugin has a very important restriction: the related entities must come from another migration. But what can you do if you need to reference entities that already exists system? You might already have users in Drupal that you want to assign as node authors. In that case, the `migration_lookup` plugin cannot be used, but `entity_lookup` can do the job.
The `entity_lookup` plugin is provided by the Migrate Plus module. You can use it to query any entity in the system and get its unique identifier. This is often used to populate entity reference fields, but it can be used to set any field or property in the destination. For example, you can query existing users and assign the `uid` node property which indicates who created the node. If no entity is found, the module returns a `NULL` value which you can use in combination of other plugins to provide a fallback behavior. The advantage of this plugin is that it does not require another migration. You can query any entity in the entire system.
The `entity_generate` plugin, also provided by the Migrate Plus module, is an extension of `entity_lookup`. If no entity is found, this plugin will automatically create one. For example, you might have a list of taxonomy terms to associate with a node. If some of the terms do not exist, you would like to create and relate them to the node.
Note: The `migration_lookup` offers a feature called stubbing that neither `entity_lookup` nor `entity_generate` provides. It allows you to create a placeholder entity that will be updated later in the migration process. For example, in a hierarchical taxonomy terms migration, it is possible that a term is migrated before its parent. In that case, a stub for the parent will be created and later updated with the real data.
Getting the example code
You can get the full code example at https://github.com/dinarcon/ud_migrations The module to enable is `UD Config entity_lookup and entity_generate examples` whose machine name is `ud_migrations_config_entity_lookup_entity_generate`. It comes with one JSON migrations: `udm_config_entity_lookup_entity_generate_node`. Read this article for details on migrating from JSON files. The following snippet shows a sample of the file:
{
  "data": {
    "udm_nodes": [
      {
        "unique_id": 1,
        "thoughtful_title": "Amazing recipe",
        "creative_author": "udm_user",
        "fruit_list": "Apple, Pear, Banana"
      },
      {...},
      {...},
      {...}
    ]
  }
}
Additionally, the example module creates three users upon installation: 'udm_user', 'udm_usuario', and 'udm_utilisateur'. They are deleted automatically when the module is uninstalled. They will be used to assign the node authors. The example will create nodes of types "Article" from the standard installation profile. You can execute the migration from the interface provided by Migrate Tools at `/admin/structure/migrate/manage/default/migrations`.
Using the entity_lookup to assign the node author
Let’s start by assigning the node author. The following snippet shows how to configure the `entity_lookup` plugin to assign the node author:
uid:
  - plugin: entity_lookup
    entity_type: user
    value_key: name
    source: src_creative_author
  - plugin: default_value
    default_value: 1
The `uid` node property is used to assign the node author. It expects an integer value representing a user ID (`uid`). The source data contains usernames so we need to query the database to get the corresponding user IDs. The users that will be referenced were not imported using the Migrate API. They were already in the system. Therefore, `migration_lookup` cannot be used, but `entity_lookup` can.
The plugin is configured using three keys. `entity_type` is set to machine name of the entity to query: `user` in this case. `value_key` is the name of the entity property to lookup. In Drupal, the usernames are stored in a property called `name`. Finally, `source` specifies which field from the source contains the lookup value for the `name` entity property. For example, the first record has a `src_creative_author` value of `udm_user`. So, this plugin will instruct Drupal to search among all the users in the system one whose `name` (username) is `udm_user`. If a value if found, the plugin will return the user ID. Because the `uid` node property expects a user ID, the return value of this plugin can be used directly to assign its value.
What happens if the plugin does not find an entity matching the conditions? It returns a `NULL` value. Then it is up to you to decide what to do. If you let the `NULL` value pass through, Drupal will take some default behavior. In the case of the `uid` property, if the received value is not valid, the node creation will be attributed to the anonymous user (uid: 0). Alternatively, you can detect if `NULL` is returned and take some action. In the example, the second record specifies the "udm_not_found" user which does not exists. To accommodate for this, a process pipeline is defined to manually specify a user if `entity_lookup` did not find one. The `default_value` plugin is used to return `1` in that case. The number represents a user ID, not a username. Particularly, this is the user ID of "super user" created when Drupal was first installed. If you need to assign a different user, but the user ID is unknown, you can create a pseudofield and use the `entity_lookup` plugin again to finds its user ID. Then, use that pseudofield as the default value.
Important: User entities do not have bundles. Do not set the `bundle_key` nor `bundle` configuration options of the `entity_lookup`. Otherwise, you will get the following error: "The entity_lookup plugin found no bundle but destination entity requires one." Files do not have bundles either. For entities that have bundles like nodes and taxonomy terms, those options need to be set in the `entity_lookup` plugin.
Using the entity_generate to assign and create taxonomy terms
Now, let’s migrate a comma separated list of taxonomy terms. An example value is `Apple, Pear, Banana`. The following snippet shows how to configure the `entity_generate` plugin to look up taxonomy terms and create them on the fly if they do not exist:
field_tags:
  - plugin: skip_on_empty
    source: src_fruit_list
    method: process
    message: 'No src_fruit_list listed.'
  - plugin: explode
    delimiter: ','
  - plugin: callback
    callable: trim
  - plugin: entity_generate
    entity_type: taxonomy_term
    value_key: name
    bundle_key: vid
    bundle: tags
The terms will be assigned to the `field_tags` field using a process pipeline of four plugins:
- `skip_on_empty` will skip the processing of this field if the record does not have a `src_fruit_list` column.
- `explode` will break the string of comma separated files into individual elements.
- `callback` will use the `trim` PHP function to remove any whitespace from the start or end of the taxonomy term name.
- `entity_generate` takes care of finding the taxonomy terms in the system and creating the ones that do not exist.
For a detailed explanation of the `skip_on_empty` and `explode` plugins see this article. For the `callback` plugin see this article. Let’s focus on the `entity_generate` plugin for now. The `field_tags` field expects an array of taxonomy terms IDs (`tid`). The source data contains term names so we need to query the database to get the corresponding term IDs. The taxonomy terms that will be referenced were not imported using the Migrate API. And they might exist in the system yet. If that is the case, they should be created on the fly. Therefore, `migration_lookup` cannot be used, but `entity_generate` can.
The plugin is configured using five keys. `entity_type` is set to machine name of the entity to query: `taxonomy_term` in this case. `value_key` is the name of the entity property to lookup. In Drupal, the taxonomy term names are stored in a property called `name`. Usually, you would include a `source` that specifies which field from the source contains the lookup value for the `name` entity property. In this case it is not necessary to define this configuration option. The lookup value will be passed from the previous plugin in the process pipeline. In this case, the trimmed version of the taxonomy term name.
If, and only if, the entity type has bundles, you also must define two more configuration options: `bundle_key` and `bundle`. Similar to `value_key` and `source`, these extra options will become another condition in the query looking for the entities. `bundle_key` is the name of the entity property that stores which bundle the entity belongs to. `bundle` contains the value of the bundle used to restrict the search. The terminology is a bit confusing, but it boils down to the following. It is possible that the same value exists in multiple bundles of the same entity. So, you must pick one bundle where the lookup operation will be performed. In the case of the taxonomy term entity, the bundles are the vocabularies. Which vocabulary a term belongs to is associated in the `vid` entity property. In the example, that is `tags`. Let’s consider an example term of "Apple". So, this plugin will instruct Drupal to search for a taxonomy term whose `name` (term name) is "Apple" that belongs to the "tags" `vid` (vocabulary).
What happens if the plugin does not find an entity matching the conditions? It will create one on the fly! It will use the value from the source configuration or from the process pipeline. This value will be used to assign the `value_key` entity property for the newly created entity. The entity will be created in the proper bundle as specified by the `bundle_key` and `bundle` configuration options. In the example, the terms will be created in the `tags` vocabulary. It is important to note that values are trimmed to remove whispaces at the start and end of the name. Otherwise, if your source contains spaces after the commas that separate elements, you might end up with terms that seem duplicated like "Apple" and " Apple".
More configuration options
Both `entity_lookup` and `entity_generate` share the previous configuration options. Additionally, the following options are only available:
`ignore_case` contains a boolean value to indicate if the query should be case sensitive or not. It defaults to true.
`access_check` contains a boolean value to indicate if the system should check whether the user has access to the entity. It defaults to true.
`values` and `default_values` apply only to the `entity_generate` plugin. You can use them to set fields that could exist in the destination entity. An example configuration is included in the code for the plugin.
One interesting fact about these plugins is that none of the configuration options is required. The `source` can be skipped if the value comes from the process pipeline. The rest of the configuration options can be inferred by code introspection. This has some restrictions and assumptions. For example, if you are migrating nodes, the code introspection requires the `type` node property defined in the process section. If you do not set one because you define a `default_bundle` in the destination section, an error will be produced. Similarly, for entity reference fields it is assumed they point to one bundle only. Otherwise, the system cannot guess which bundle to lookup and an error will be produced. Therefore, always set the `entity_type` and `value_key` configurations. And for entity types that have bundles, `bundle_key` and `bundle` must be set as well.
Note: There are various open issues contemplating changes to the configuration options. See this issue and the related ones to keep up to date with any future change.
Compromises and limitations
The `entity_lookup` and `entity_generate` plugins violate some ETL principles. For example, they query the destination system from the process section. And in the case of `entity_generate` it even creates entities from the process section. Ideally, each phase of the ETL process is self contained. That being said, there are valid uses cases to use these plugins and they can you save time when their functionality is needed.
An important limitation of the `entity_generate` plugin is that it is not able to clean after itself. That is, if you rollback the migration that calls this plugin, any created entity will remain in the system. This would leave data that is potentially invalid or otherwise never used in Drupal. Those values could leak into the user interface like in autocomplete fields. Ideally, rolling back a migration should delete any data that was created with it.
The recommended way to maintain relationships among entities in a migration project is to have multiple migrations. Then, you use the `migration_lookup` plugin to relate them. Throughout the series, several examples have been presented. For example, this article shows how to do taxonomy term migrations.
What did you learn in today’s blog post? Did you know how to configure these plugins for entities that do not have bundles? Did you know that reverting a migration does not delete entities created by the `entity_generate` plugin? Did you know you can assign fields in the generated entity? Share your answers in the comments. Also, I would be grateful if you shared this blog post with others.
Next: How to debug Drupal migrations - Part 1
This blog post series, cross-posted at UnderstandDrupal.com as well as here on Agaric.coop, is made possible thanks to these generous sponsors. Contact Understand Drupal if your organization would like to support this documentation project, whether it is the migration series or other topics.
As Elon Musk destroys Twitter, a lot of clients have asked about alternative social media, especially 'Mastodon'— meaning the federated network that includes thousands of servers, running that software and many other FLOSS applications, all providing interconnecting hubs for distributed social media. Agaric has some experience in those parts, so we are sharing our thoughts on the opportunity in this crisis.
In short: For not-for-profit organizations and news outlets especially, this is a chance to host your own communities by providing people a natural home on the federated social web.
Every not-for-profit organization lives or dies, ultimately, based on its relationship with its supporters. Every news organization, it's readers and viewers.
For years now, a significant portion of the (potential) audience relationship of most organizations has been mediated by a handful of giant corporations through Google search, Facebook and Twitter social media.
A federated approach based on a protocol called ActivityPub has proven durable and viable over the past five years. Federated means different servers run by different people or organizations can host people's accounts, and people can see, reply to, and boost the posts of people on the other servers. The most widely known software doing this is Mastodon but it is far from alone. Akkoma, Pleroma, Friendica, Pixelfed (image-focused), PeerTube (video-focused), Mobilizon (event-focused), and more all implement the ActivityPub protocol. You can be viewing and interacting with someone using different software and not know it— similar to how you can call someone on the phone and not know their cellular network nor their phone model.
The goal of building a social media following of people interested in (and ideally actively supporting) your organization might be best met by setting up your own social media.
This is very doable with the 'fediverse' and Mastodon in particular. In particular, because the number of people on this ActivityPub-based federated social web has already grown by a couple million in the past few weeks— and that's with Twitter not yet having serious technical problems that are sure to come with most of its staff laid off. With the likely implosion of Twitter, giving people a home that makes sense for them is a huge service in helping people get started— the hardest part is choosing a site!
People fleeing Twitter as it breaks down socially and technically would benefit from your help in getting on this federated social network. So would people who have never joined, or long since left, Twitter or other social media, but are willing to join a network that is less toxic and is not engineered to be addictive and harmful.
Your organization would benefit by having a relationship with readers that is not mediated by proprietary algorithms nor for-profit monopolies. It makes your access on this social network more like e-mail lists— it is harder for another entity to come in between you and your audience and take access away.
But the mutual benefits for the organization and its audience go beyond all of this.
When people discuss among one another what the organization has done and published, a little bit of genuine community forms.
Starting a Mastodon server could be the start of your organization seeing itself as not only doing good works or publishing media, but building a better place for people to connect and create content online.
The safety and stability of hosting a home on this federated social network gives people a place to build community.
But organizations have been slow to adopt, even now with the Twitter meltdown. This opens up tho opportunity for extra attention and acquiring new followers.
Hosting the server could cost between $50 to $450 a month, but this is definitely an opportunity to provide a pure community benefit (it is an ad-free culture) and seek donations, grants, or memberships.
The true cost is in moderation time; if volunteers can start to fill that you are in good shape. A comprehensive writeup on everything to consider is here courtesy the cooperatively-managed Mastodon server that Agaric Technology Collective chose to join at social.coop's how to make the fediverse your own.
You would be about the first for not-for-profit or news organizations.
You would be:
- giving people a social media home right when they need it
- literally owning the platform much of your community is on
And it all works because of the federation aspect— your organization does not have to provide a Twitter, TikTok, or Facebook replacement yourselves, you instead join the leading contender for all that.
By being bold and early, you will also get media attention and perhaps donations and grants.
The real question is if it would divert scarce resources from your core work, or if the community-managing aspects of this could bring new volunteer (or better, paid) talent to handle this.
Even one person willing to take on the moderator role for a half-hour a day to start should be enough to remove any person who harasses people on other servers or otherwise posts racist, transphobic, or other hateful remarks.
Above all, your organization would be furthering your purpose, through means other than its core activities or publishing, to inform and educate and give people more capacity to build with you.
Not surprisingly, Drupal has already figured this out!
Throughout the series, we explored many migration topics. We started with an overview of the ETL process and workflows for managing migrations. Then, we presented example migrations for different entities: nodes, files, images, taxonomy terms, users, and paragraphs. Next, we shifted focus to migrations from different sources: CSV, JSON, XML, Google Sheet, Microsoft Excel, and LibreOffice Calc files. Later, we explored how to manage migrations as configuration, use groups to share configuration, and execute migrations from the user interface. Finally, we gave recommendations and provided tools for debugging migrations from the command line and the user interface. Although we covered a lot of ground, we only scratched the surface. The Migrate API is so flexible that its use cases are virtually endless. To wrap up the series, we present an introduction to a very popular topic: Drupal upgrades. Let’s get started.
Note: In this article, when we talk about Drupal 7, the same applies to Drupal 6.
What is a Drupal upgrade?
The information we presented in the series is generic enough that it applies to many types of Drupal migrations. There is one particular use case that stands out from the rest: Drupal upgrades. An upgrade is the process of taking your existing Drupal site and copy its configuration and content over to a new major version of Drupal. For example, going from Drupal 6 or 7 to Drupal 8. The following is an oversimplification of the workflow to perform the upgrade process:
- Install a fresh Drupal 8 site.
- Add credentials so that the new site can connect to Drupal 7’s database.
- Use the Migrate API to generate migration definition files. They will copy over Drupal 7’s configuration and content. This step is only about generating the YAML files.
- Execute those migrations to bring the configuration and content over to Drupal 8.
Preparing your migration
Any migration project requires a good plan of action, but this is particularly important for Drupal upgrades. You need to have a general sense of how the upgrade process works, what assumptions are made by the system, and what limitations exist. Read this article for more details on how to prepare a site for upgrading it to Drupal 8. Some highlights include:
- Both sites need to be in the latest stable version of their corresponding branch. That means the latest release of Drupal 7 and 8 at the time of performing the upgrade process. This also applies to any contributed module.
- Do not do any configuration of the Drupal 8 site until the upgrade process is completed. Any configuration you make will be overridden, and there is no need for it anyways. Part of the process includes recreating the old site’s configuration: content types, fields, taxonomy vocabularies, etc.
- Do not create content on the Drupal 8 site until the upgrade process is completed. The upgrade process will keep the unique identifiers from the source site: `nid`, `uid`, `tid`, `fid`, etc. If you were to create content, the references among entities could be broken when the upgrade process overrides the unique identifiers. To prevent data loss, wait until the old site's content has been migrated to start adding content to the new site.
- For the system to detect a module’s configuration to be upgraded automatically, it has to be enabled on both sites. This applies to contributed modules in Drupal 7 (e.g., link) that were moved to core in Drupal 8. Also to Drupal 7 modules (e.g. address field) that were superseded by a different one in Drupal 8 (e.g. address). In any of those cases, as long as the modules are enabled on both ends, their configuration and content will be migrated. This assumes that the Drupal 8 counterpart offers an automatic upgrade path.
- Some modules do not offer automatic upgrade paths. The primary example is the Views module. This means that any view created in Drupal 7 needs to be manually recreated in Drupal 8.
- The upgrade procedure is all about moving data, not logic in custom code. If you have custom modules, the custom code needs to be ported separately. If those modules store data in Drupal’s database, you can use the Migrate API to move it over to the new site.
- Similarly, you will have to recreate the theme from scratch. Drupal 8 introduced Twig which is significantly different to the PHPTemplate engine used by Drupal 7.
Customizing your migration
Note that the creation and execution of the migration files are separate steps. Upgrading to a major version of Drupal is often a good opportunity to introduce changes to the website. For example, you might want to change the content modeling, navigation, user permissions, etc. To accomplish that, you can modify the generated migration files to account for any scenario where the new site’s configuration diverts from the old one. And only when you are done with the customizations, you execute the migrations. Examples of things that could change include:
- Combining or breaking apart content types.
- Moving data about people from node entities to user entities, or vice versa.
- Renaming content types, fields, taxonomy vocabularies and terms, etc.
- Changing field types. For example, going from Address Field module in Drupal 7 to Address module in Drupal 8.
- Merging multiple taxonomy vocabularies into one.
- Changing how your content is structured. For example, going from a monolithic body field to paragraph entities.
- Changing how your multimedia files are stored. For example, going from image fields to media entities.
Performing the upgrade
There are two options to perform the upgrade. In both cases, the process is initiated from the Drupal 8 site. One way is using the Migrate Drupal UI core module to perform the upgrade from the browser’s user interface. When the module is enabled, go to `/upgrade` and provide the database credentials of the Drupal 7 site. Based on the installed modules on both sites, the system will give you a report of what can be automatically upgraded. Consider the limitations explained above. While the upgrade process is running, you will see a stream of messages about the operation. These messages are logged to the database so you can read them after the upgrade is completed. If your dataset is big or there are many expensive operations like password encryption, the process can take too long to complete or fail altogether.
The other way to perform the upgrade procedure is from the command line using Drush. This requires the Migrate Upgrade contributed module. When enabled, it adds Drush commands to import and rollback a full upgrade operation. You can provide database connection details of the old site via command line options. One benefit of using this approach is that you can create the migration files without running them. This lets you do customizations as explained above. When you are done, you can run the migrations following the same workflow of manually created ones.
Known issues and limitations
Depending on whether you are upgrading from Drupal 6 or 7, there is a list of known issues you need to be aware of. Read this article for more information. One area that can be tricky is multilingual support. As of this writing, the upgrade path for multilingual sites is not complete. Limited support is available via the Migrate Drupal Multilingual core module. There are many things to consider when working with multilingual migrations. For example, are you using node or field translations? Do entities have revisions? Read this article for more information.
Upgrade paths for contributed modules
The automatic upgrade procedure only supports Drupal core modules. This includes modules that were added to core in Drupal 8. For any other contributed module, it is the maintainers’ decision to include an automatic upgrade path or not. For example, the Geofield module provides an upgrade path. It is also possible that a module in Drupal 8 offers an upgrade path from a different module in Drupal 7. For example, the Address module provides an upgrade path from the Address Field module. Drupal Commerce also provides some support via the Commerce Migrate module.
Not every module offers an automated upgrade path. In such cases, you can write custom plugins which ideally are contributed back to Drupal.org ;-) Or you can use the techniques learned in the series to transform your source data into the structures expected by Drupal 8. In both cases, having a broad understanding of the Migrate API will be very useful.
Upgrade strategies
There are multiple migration strategies. You might even consider manually recreating the content if there is only a handful of data to move. Or you might decide to use the Migrate API to upgrade part of the site automatically and do a manual copy of a different portion of it. You might want to execute a fully automated upgrade procedure and manually clean up edge cases afterward. Or you might want to customize the migrations to account for those edge cases already. Michael Anello created an insightful presentation on different migration strategies. Our tips for writing migrations apply as well.
Drupal upgrades tend to be fun, challenging projects. The more you know about the Migrate API the easier it will be to complete the project. We enjoyed writing this overview of the Drupal Migrate API. We would love to work on a follow up series focused on Drupal upgrades. If you or your organization could sponsor such endeavor, please reach out to us via the site’s contact form.
What about upgrading to Drupal 9?
In March 2017, project lead Dries Buytaert announced a plan to make Drupal upgrades easier forever. This was reinforced during his keynote at DrupalCon Seattle 2019. You can watch the video recording in this link. In short, Drupal 9.0 will be the latest point release of Drupal 8 minus deprecated APIs. This has very important implications:
- When Drupal 9 is released, the Migrate API should be mostly the same as Drupal 8. Therefore, anything that you learn today will be useful for Drupal 9 as well.
- As long as your code does not use deprecated APIs, upgrading from Drupal 8 to Drupal 9 will be as easy as updating from Drupal 8.7 to 8.8.
- Because of this, there is no need to wait for Drupal 9 to upgrade your Drupal 6 or 7 site. You can upgrade to Drupal 8 today.
Thank you!
And that concludes the #31DaysOfMigration series. For joining us in this learning experience, thank you very much! ¡Muchas gracias! Merci beaucoup! :-D We are also very grateful to Agaric.coop, Drupalize.Me, and Centarro.io for sponsoring this series.
What did you learn in today’s blog post? Did you know the upgrade process is able to copy content and configuration? Did you know that you can execute the upgrade procedure either from the user interface or the command line? Share your answers in the comments. Also, we would be grateful if you shared this blog post with others.
This blog post series, cross-posted at UnderstandDrupal.com as well as here on Agaric.coop, is made possible thanks to these generous sponsors: Drupalize.me by Osio Labs has online tutorials about migrations, among other topics, and Agaric provides migration trainings, among other services. Contact Understand Drupal if your organization would like to support this documentation project, whether it is the migration series or other topics.
The major problem — one of the major problems, for there are several — one of the many major problems with governing people is that of whom you get to do it; or rather of who manages to get people to let them do it to them.
To summarize: it is a well-known fact that those people who must want to rule people are, ipso facto, those least suited to do it. To summarize the summary: anyone who is capable of getting themselves made President should on no account be allowed to do the job. To summarize the summary of the summary: people are a problem.
Chapter 28, The Restaurant at the End of the Universe, by Douglas Adams in the Hitchhiker's Guide to the Galaxy series.
On a cold December night we met at the Industry Lab to celebrate the Worc'n group and our membership in the cooperatives we belong to. The crowd was very energetic and several small groups were conversing on different topics throughout the evening. A holiday party is a time to see old friends and make new friends.
A cooperative is a structure to make new connections and share ideas. What better mix for a party. 2014 ended on a high note as the cooperative movement gains ground in Cambridge, MA. Worc'n (the Worker-Owned and Run Cooperative Network of Greater Boston) has been around for years and has an impressive number of cooperatives and owner-workers among their members. This party was sort of a merging of groups in the sense that Worc'n has been around for a long time, growing a membership and creating value.
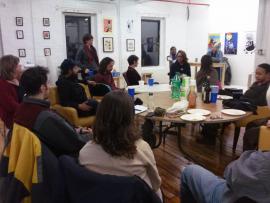
The Boston/Cambridge Worker-ownership Meetup just started a few months ago, but through the network of local cooperatives, the word spread quickly and people have been expressing their happiness that there are now some meetngs to attend and new people to network with. The party was a Pot Luck and everyone brought something to share. There were homemade cookies, cakes and pie. We also were fortunate to have Monica Leitner-Laserna of La Sanghita Cafe attend the party with some delicious vegan foods from her newly formed cooperative restaurant in East Boston.

La Sanghita Cafe is Boston's only cooperative restaurant and they have a great vegan menu. Located just outside Maverick Square in East Boston, the restaurant is open daily for lunch and Wednesday through Saturday they offer a dinner menu. The menu is filled with sweet and savory items and the space is so comfortable and cozy. We look forward to having the coop members as guests at our monthly cooperative worker/owner meetup, to share the details on how it works to build a cooperative restaurant. Good food, good conversation and many engaging in discussion on topics involving cooperation, a wonderful evening was had by all. We should do this more often.
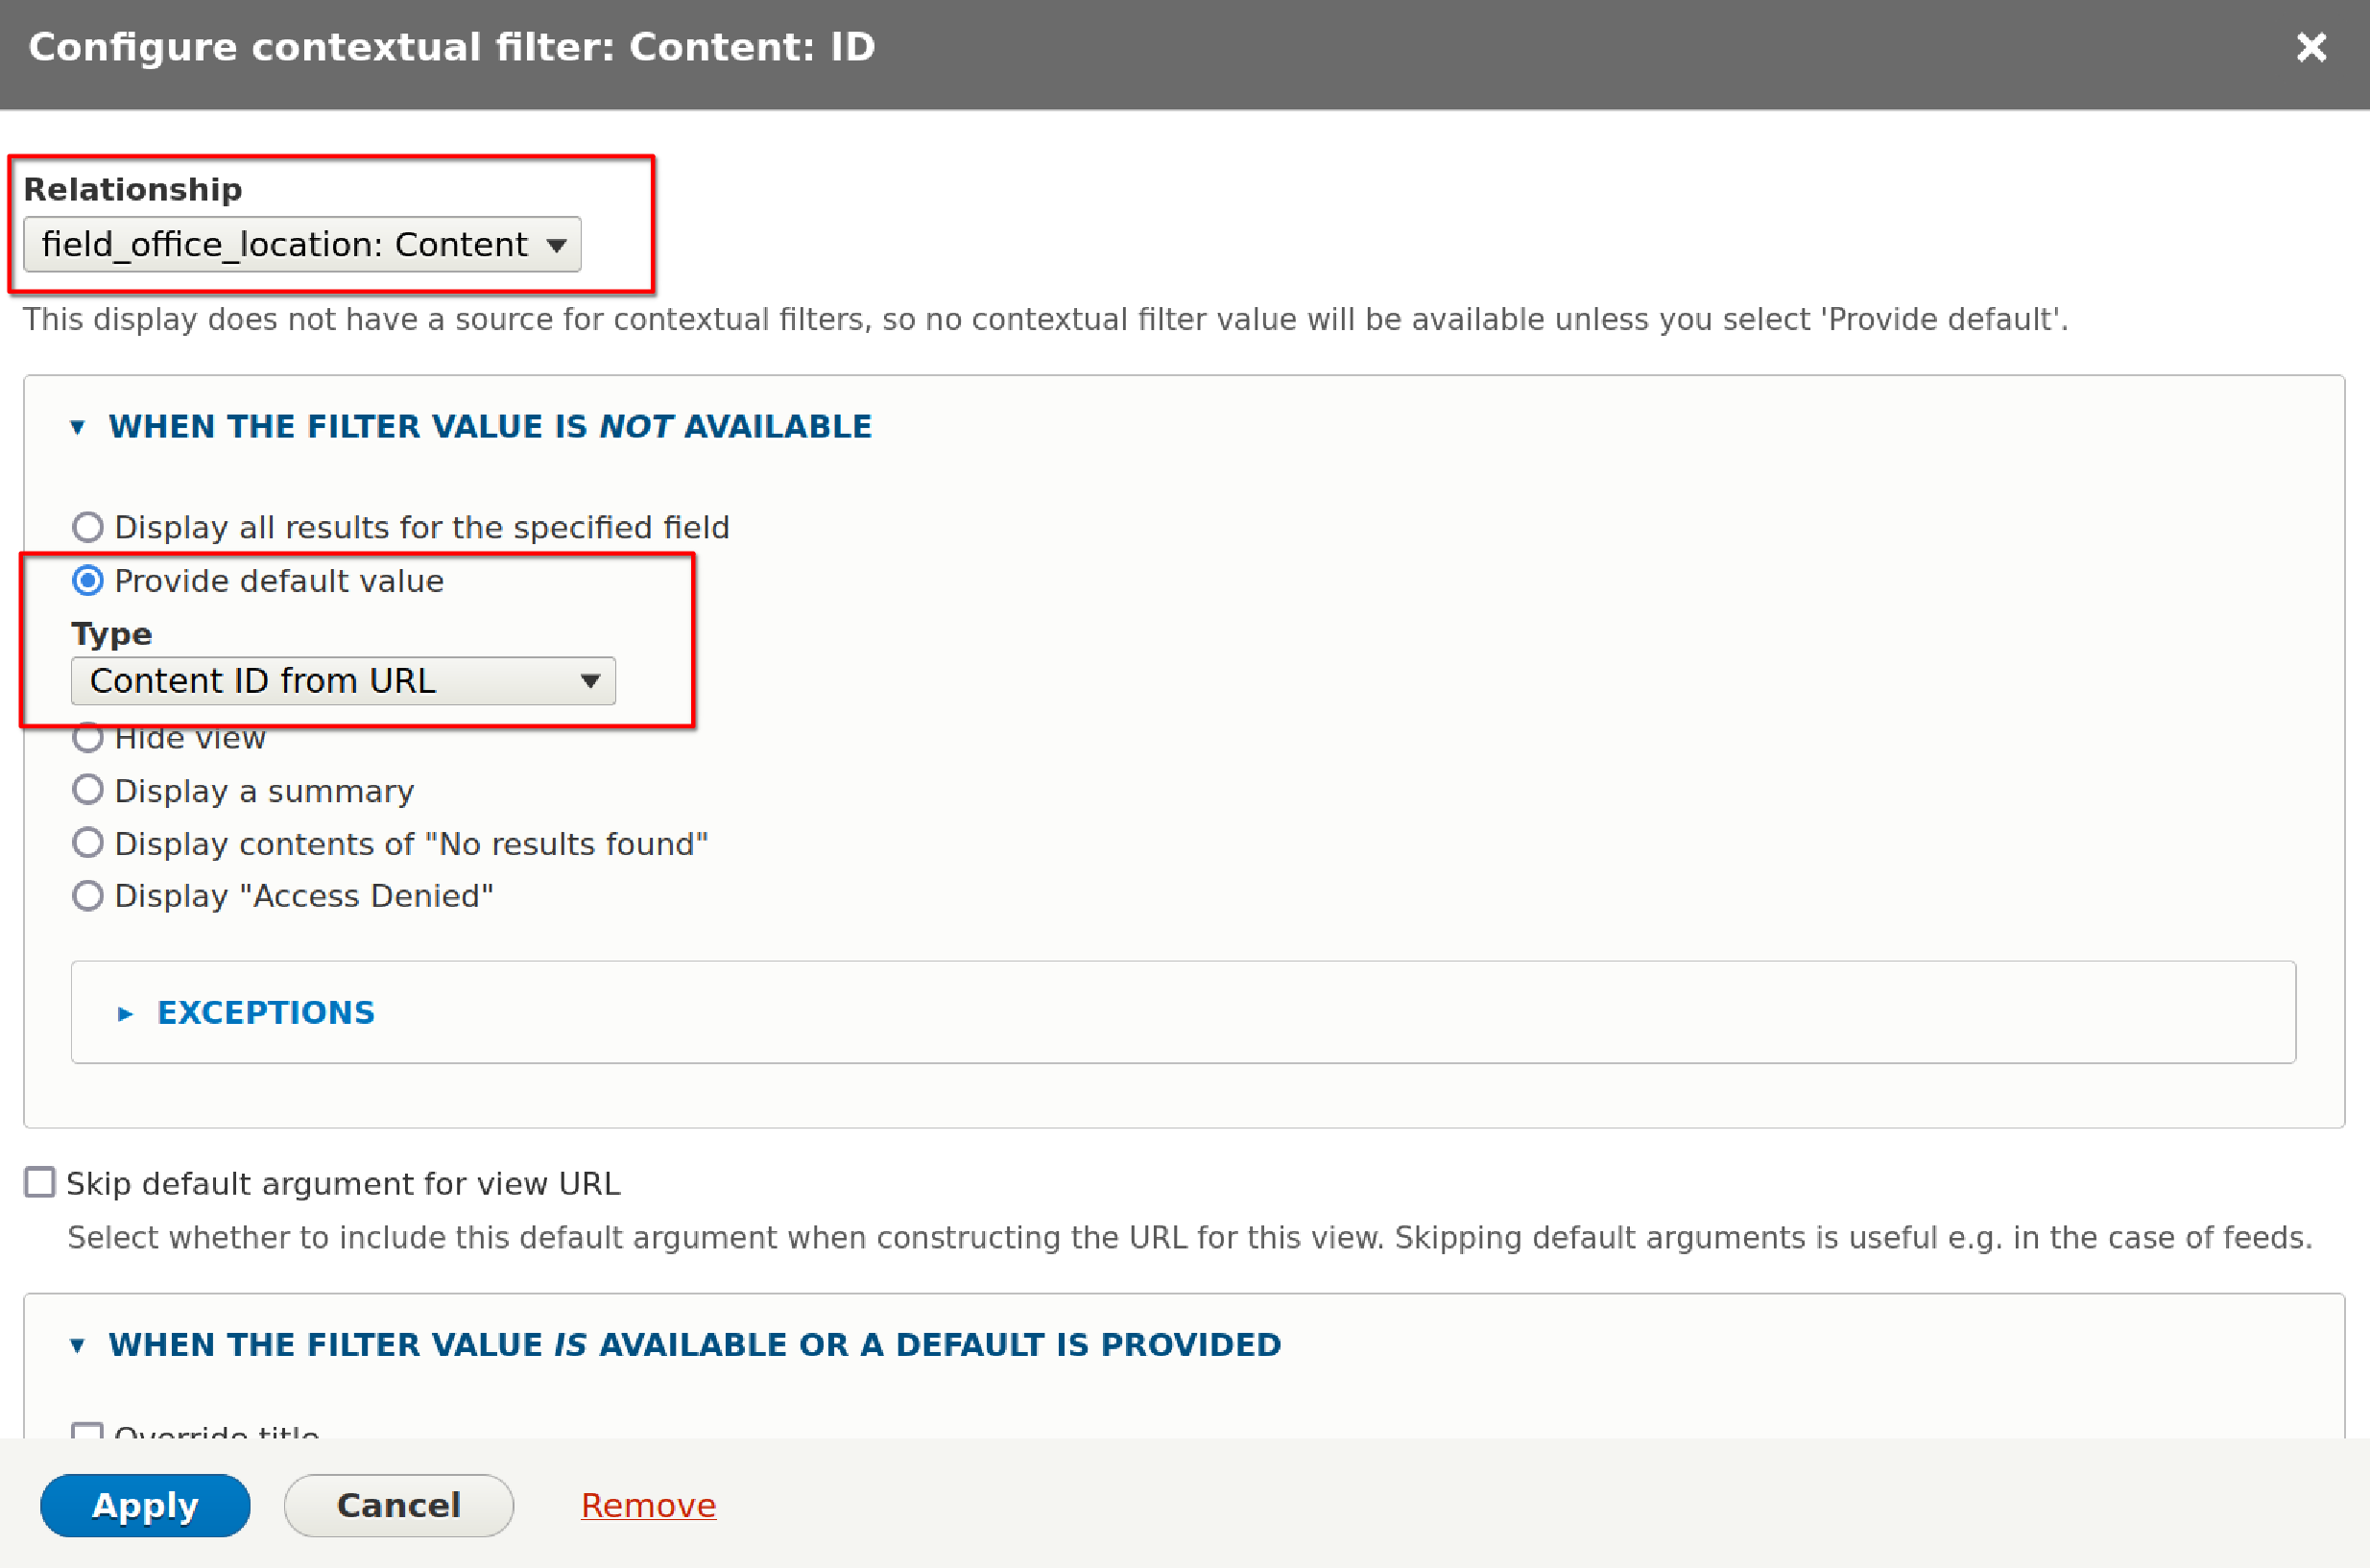
Select ID and click Add and configure contextual filters.
Sobre el Mapa
El Mapa de Acción de Justicia Climática (CJAM) es una herramienta de mapeo personalizada que extrae 350 eventos y grupos de múltiples fuentes de datos (por ejemplo: ActionKit, EveryAction, CiviCRM) y muestra un mapa interactivo que los partidarios pueden usar para involucrarse.
Se puede incrustar en sitios web con muchas opciones de personalización (por ejemplo: preestablecer el centro del mapa en una ubicación, mostrar el texto y los botones del mapa en un idioma diferente, mostrar solo eventos relacionados con una campaña en particular, etc.).
Utiliza Mapbox para el mapa, OpenStreetMaps para el conjunto de mosaicos y Google Maps para la búsqueda.
La aplicación CJAM Extract, Transform Load (ETL) es un procesador de datos escrito en Python que se ejecuta cada 15 minutos y extrae datos de esas muchas fuentes (por ejemplo: EveryAction, CiviCRM) a través de API y consultas directas de SQL. Escribe el evento combinado y los datos del grupo en un archivo de datos JSON alojado en Amazon S3, que luego es consumido por el JavaScript CJAM.
Nuestro Enfoque
Nos reunimos con 350 a mediados de junio, con las huelgas programadas para el 20 de septiembre y organizando impulsos en julio y agosto. Con plazos ajustados, un nuevo equipo y una nueva base de código, rápidamente nos pusimos manos a la obra para comprender los objetivos del mapa, su implementación actual y lo que había que hacer para cada hito.
Los Usuarios Primero: Aclarar los Objetivos
En los proyectos que requieren cambios rápidos, es tentador sumergirse primero en la cola de problemas. Sin embargo, sabemos que un proyecto solo tiene éxito si todos están alineados con los objetivos generales del proyecto. Afortunadamente, el equipo del producto ya tenía una excelente documentación (¡incluso tenían una presentación de diapositivas!) Sobre cuál es el propósito del mapa de acción climática y sus audiencias clave.
350.org tuvo una presentación de diapositivas que detalla los objetivos y el público, lo que nos ayudó a obtener los conocimientos básicos necesarios para colaborar de manera efectiva.
Objetivos
- Para demostrar la escala geográfica de nuestro trabajo a los visitantes.
- Para conectar a los visitantes del sitio a las siguientes actividades:
- Asistir a un evento
- Participe con un grupo local
- Conozca nuestro trabajo regional - Para dar al personal la capacidad de incrustar el mapa en diferentes sitios y personalizarlo para adaptarse a los propósitos de las páginas en las que se está incrustando.
Audiencias Primarias
-
Visitante del sitio
-
Insertador de mapas
Fue genial tener estos documentos en nuestra llamada inicial.
Refactor Mientras Aprende
Familiarizarse con el funcionamiento interno del mapa de acción climática fue particularmente desafiante porque el código estaba esencialmente en dos estados: la rama principal con el JavaScript personalizado original y una rama refactorizadora donde estaba ocurriendo la transición a React.js. React es uno de los frameworks más populares y ampliamente utilizados. La conversión de la aplicación a React hizo que el código fuera más fácil de mantener y desarrollar. El desarrollador voluntario original había comenzado este proceso de conversión y había nuevas características escritas en la nueva forma Reaccionar, no disponibles hasta que se completara la refactorización.
Mauricio y Chris se reunieron con él para aclarar cómo ver la transición hasta el final. Luego se familiarizaron con la base de código y refactorizaron en el camino. Al comprender, por ejemplo, una función larga y compleja, y luego reescribirla en funciones discretas más pequeñas, pudimos simplificar el código, comprender nuestro funcionamiento interno y facilitar el trabajo para que el próximo desarrollador se una al proyecto .
Depuración de Problemas
Cuando se trabaja por primera vez con una base de código, lleva tiempo entender por qué un nuevo cambio no se mantiene o por qué se produce un error. Los registros son el mejor amigo de un desarrollador cuando se trata de depuración. Desafortunadamente, el registro disponible fue marcado. El ETL tenía un registro en ejecución, pero no se guardaba en un archivo para referencia futura o recuperación fácil. Chris mejoró el registro de errores e incluso agregó la integración de Slack enviando un mensaje al equipo cada vez que ocurría un error, ayudando a las personas a responder rápidamente a los problemas.
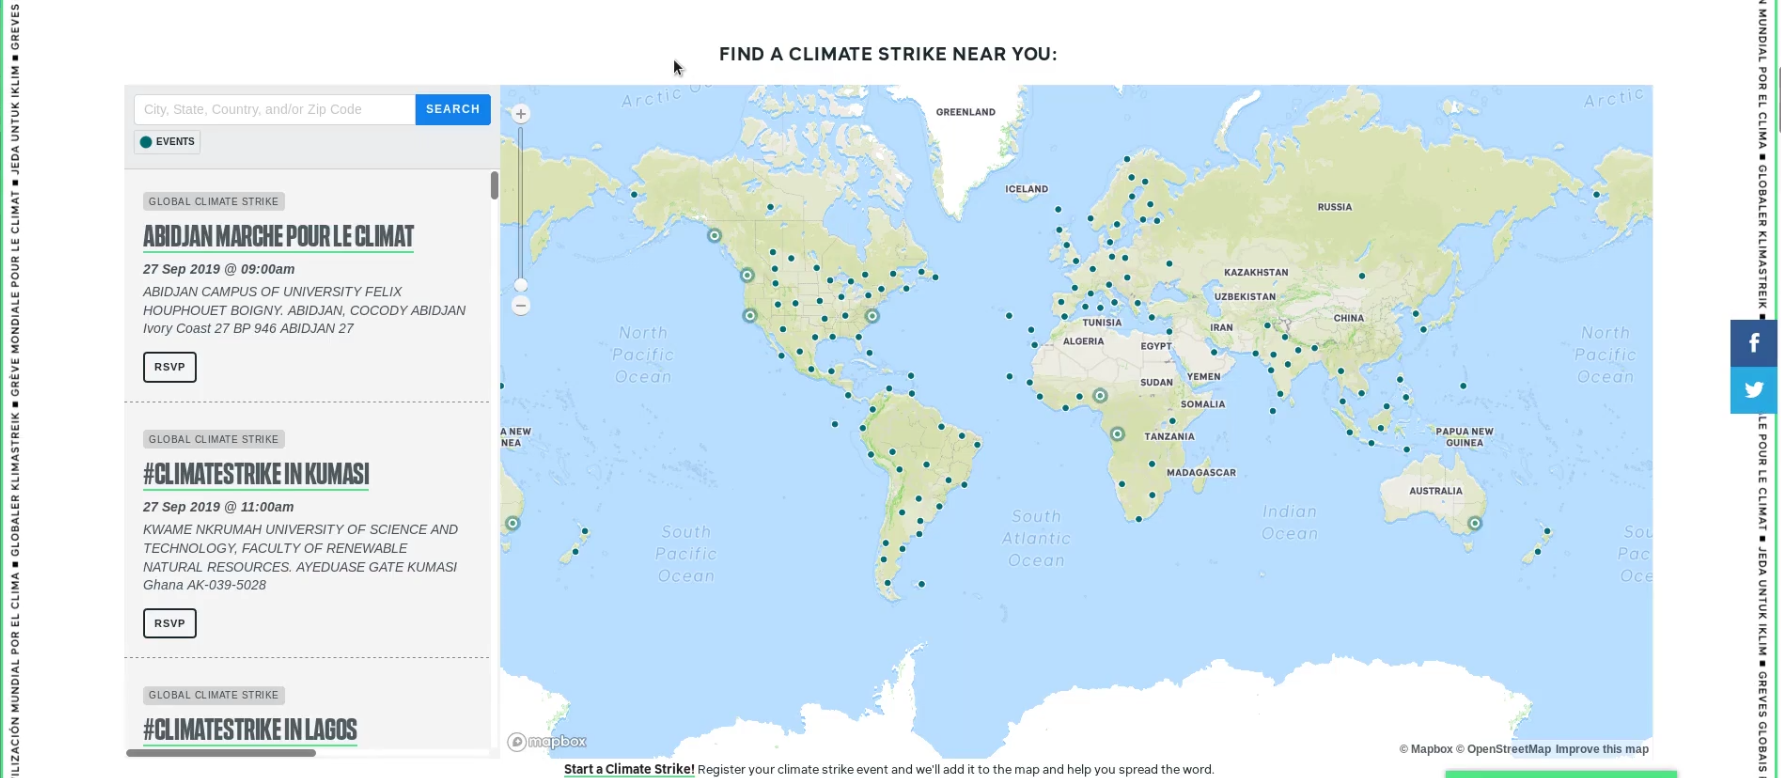
Ataque Global, Movilización Local
350.org tiene cientos de capítulos, repartidos en siete continentes, con miembros que hablan docenas de idiomas. Su herramienta de mapeo fue construida con esta diversidad en mente. Sirve como un poderoso dispositivo para contar historias (objetivo número uno), con un solo mapa que transmite el impresionante alcance del movimiento y no hace suposiciones sobre dónde está un visitante o qué está buscando.
Por otro lado, la movilización es más efectiva cuando proviene de personas que conocemos, de comunidades de las que formamos parte. Como tal, el mapa puede vivir en contextos más localizados, mostrando solo eventos y grupos relevantes para un escenario particular. Por ejemplo, el capítulo 350 Colorado puede mostrar un mapa ampliado en Mountain West, mientras que 350 Francia puede mostrar un mapa con solo eventos en francés.
Estos mapas personalizados se crean utilizando parámetros de inserción. Para hacer esto, un organizador de 350.org pegó el mapa en una página usando un iframe, pasando parámetros como el idioma, la ubicación y la fuente de datos al incluir un parámetro de consulta en la url.
Sin embargo, este enfoque era engorroso, técnicamente prohibitivo y propenso a errores. Descartamos el enfoque de iframe y lo reemplazamos con una serie de códigos cortos, un método más intuitivo, que realiza llamadas directas a la API de Mapa de Acción Climática para representar un mapa específico para las necesidades de un organizador.
Agregamos soporte para los siguientes códigos cortos:
- data-src-search: pase un término de búsqueda de ubicación y el mapa realizará una búsqueda previa a esa campaña de evento de ubicación: muestra solo los resultados etiquetados con una campaña específica, por ejemplo: "ataque climático"
- date-range-start - muestra eventos que comienzan en o después de una fecha determinada
- date-range-end: muestra eventos que finalizan antes o en una fecha determinada
- data-src-lang - muestra el texto del mapa en un idioma determinado
- data-src-latlong: centra el mapa en cierto punto de latitud y longitud
- data-src-zoom: establece el nivel de zoom predeterminado
- data-src-layers: especifique qué tipo de datos mostrar (campaña, evento, grupo)
Ahora los organizadores pueden crear cualquier cantidad de mapas con criterios que satisfagan las necesidades específicas de su campaña o comunidad.
¿Qué es exactamente el "futuro"? - Cálculo de Zonas Horarias con Python
With so many different events happening at any given time, the map risked overwhelming visitors looking to get involved. 350.org's designer Matthew Hinders-Anderson came up with the solution of applying different map pin styles to events depending on when they were happening. Past events have a subdued teal, while current and future events have a strong teal. To emphasize the storytelling (goal number) of the map, current events throb.
Para lograr esto, necesitábamos calcular la fecha y hora de un evento en relación con la hora actual. Desafortunadamente, muchos de los eventos no tenían zona horaria asociada a ellos. Sin embargo, todos tenían alguna forma de ubicación disponible. Chris encontró una práctica herramienta de Python llamada timezonefinder que calcula la zona horaria de un evento en función de la latitud y la longitud.
Con la zona horaria en la mano, Mauricio podría aplicar los diferentes colores (y parpadear) en función del tiempo del evento en relación con ahora.
Utilizamos Python para calcular la zona horaria de un evento en función de su latitud y longitud.
Incorporación Perfecta
Con tantos eventos organizados, queríamos que los posibles huelguistas encontraran un evento para asistir rápidamente. Sin embargo, se encontraron embebedores de mapas, que a veces las búsquedas daban como resultado un mapa vacío, a pesar de que los eventos estaban cerca. Este es uno de los muchos desafíos de diseñar mapas interactivos. Un ejemplo fue un visitante que vivía en un suburbio cercano de Boston. Una búsqueda de Allston no resultaría nada, a pesar de que haya múltiples eventos dentro de un radio de 5 millas. Ajustamos el comportamiento del zoom para mostrar mejor los eventos cercanos.
Sin embargo, todavía había casos extremos. Abordamos esto mostrando un botón de "Alejar" si un visitante aparecía vacío. Al hacer clic, se aleja a un usuario al resultado más cercano.

Si un visitante no obtiene resultados de su búsqueda, puede alejarse al evento o grupo más cercano.
Los Resultados
El plan de movilización era presionar a activistas y organizadores para que planificaran eventos de junio a agosto. Luego reúna a tantas personas para confirmar su asistencia a los eventos recién creados desde agosto hasta los grandes días: 20 de septiembre y 27 de septiembre. En agosto, implementamos la funcionalidad de código de inserción que los organizadores utilizaron bien, incorporando mapas específicos locales y regionales en 350 páginas grupales locales y sitios web específicos sobre el impacto climático que habían construido.
El mapa era tan popular que otras organizaciones preguntaron si podían insertarlo en sus propios sitios, aumentando los puntos de movilización y el público alcanzado. El hecho de que pudiéramos hacer esto habla de la importancia de defender la web abierta y el software libre y de código abierto que permite compartir y utilizar herramientas de forma descentralizada.
El primer día de las huelgas, los estilos de alfileres cobraron vida, iluminando las numerosas huelgas, manifestaciones y protestas que ocurrieron ese día. Fue un gráfico para periodistas y simpatizantes en las redes sociales para compartir cuando informaban sobre una participación sin precedentes.
En última instancia, los números que vimos fueron un testimonio de los largos y arduos esfuerzos que los organizadores trabajan constantemente y la urgencia del momento en que nos encontramos. Sin embargo, con herramientas como el Mapa de Acción de Justicia Climática, creado por activistas tecnológicos junto con los organizadores que los utilizan, profundizamos y ampliamos la movilización posible. Y en estos tiempos de desigualdad masiva de la riqueza, profunda corrupción política y cierre de la ventana de tiempo para la acción audaz que necesitamos, interrumpir el statu quo es más importante que nunca.
Overview
React.js has become one of the top players in the JavaScript libraries world. Drupal has recently adopted the library to create admin interfaces. WordPress has rebuilt its WYSIWYG editor using React. This training aims to explain the basic concepts outside of the context of any particular CMS implementation. Throughout the training, a static site will be converted into a React application. No previous experience with the library is required.